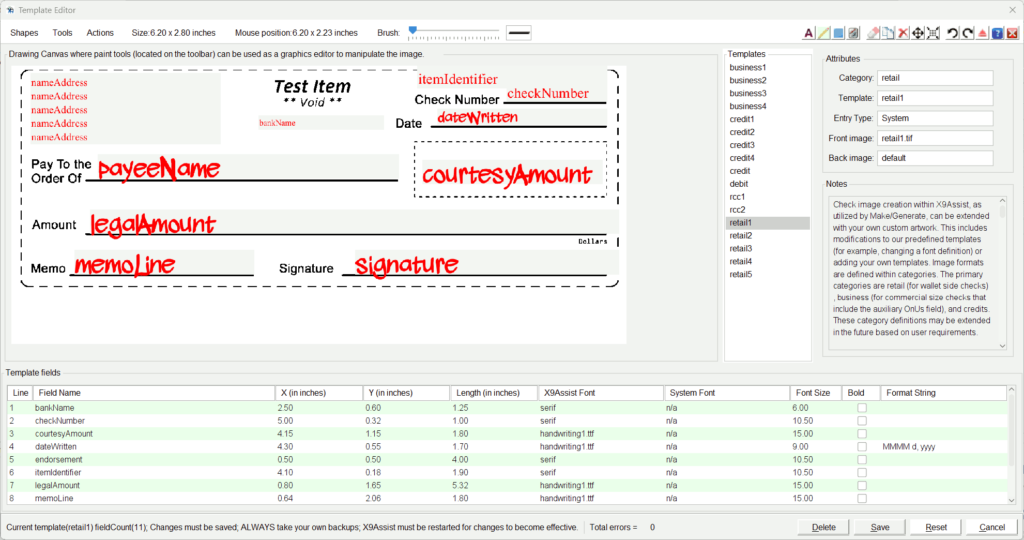
Check image creation within X9Assist, as utilized by Make/Generate, can be extended with your own custom artwork. This includes modifications to our predefined templates (for example, changing a font size or definition) or adding your own templates. Image formats are defined within predefined categories, which are retail (for wallet side checks), business (for commercial size checks that include the auxiliary OnUs field), and credits. These category definitions may be extended in the future based on user requirements.
The Template Editor allows the image templates used by Make/Generate to be viewed, modified, created, and saved. Template definitions are xml files stored in the / documents / x9_assist / xml / templates / folder. Overall, this process can become complex, and use of this tool should be considered as an advanced topic. We recommend that you frequently backup the xml template definitions when the Template Editor is being used.
The editor provides functionality in two areas. First is that it allows the x/y positions of template fields to be updated based on their visual placement within the template. Without this, the process of adjusting positions is very complex, since you cannot easily determine the overlay positions of the various template fields. Second is that the editor eliminates the need to manually update the associated xml files needed to support templates. Without the editor, these xml files must be updated on a manual basis using tools such as NotePad, NotePad++, or WordPad.
This editor makes the process of creating and updating those parameters much easier than the alternative of using a simple text editor (eg, NotePad or NotePad++). Using our Template Editor eliminates the xml document errors that can often result from that alternative process. This editor allows you to concentrate on content and not all of the technical intricacies that are associated with an XML file.
Functionality
The editor allows existing templates to be viewed and modified. It also allows new templates to be added or deleted. All needed xml files (including templates.xml) are updated.
The editor also includes a rudimentary paint tool. We realize that the paint tools are very basic, but there are enough tools to allow basic templates to be drawn. The editor allows an existing template to be saved with an alternate name, allowing it to be the basis for new work. This is the only available method for creating a new template.
The paint tools include basic shapes including line, rectangle, and text, along with undo and redo. These shapes can be drawn onto the underlying image, and will be burned into the template image when saved. The paint tools are an attempt to simplify your template development work. They are not envisioned as the end-all that would completely eliminate the need to use other tools such as MS-Paint or Gimp.
The editor displays the currently loaded template image within a drawing canvas in the upper left panel. Mouse coordinates are displayed on the toolbar as the move is moved within the panel. Our drawing actions are located on the toolbar, and you should read through the popup help that is associated with each functional icon.
The editor also displays the fields that have x-y coordinates for this template. These fields are shown within the lower panel, where the data can be modified. For example, to move a template field to a new position on the drawing canvas, move the mouse to where you want the field to be positioned. Make note of the mouse x-y coordinates and then enter those positions within the field table. You will see that the field is then moved accordingly within the canvas.
Fields can be displayed using either an X9Assist font or a System font. The X9Assist fonts are internally defined and always available. The System fonts are dependent on the fonts that are available within the system font directory for the current workstation. You need to be careful when using System fonts, since these fonts are not permanent; they may come and go.
As part of saving a template, the image will always be written in black-white TIFF, regardless of the original format. This is an image exchange (x9.100-181) standard.
Delete formats WITH CARE. You should never delete a system supplied format, since X9Assist is dependent on the existence of these templates.
Tools
The editor supports the following tools:
- Text – adds specific text where the font and size can be selected.
- Line – draws a straight line, which can be dragged to size.
- Rectangle – draws a rectangle, which can be dragged to size.
- Draw – allows free form text to be drawn, using the current brush size.
- Erase – allows image pixels to be cleared, using the current brush size.
- Copy – copies the shape that is current positioned under the mouse.
- Remove – removes the shape that is current positioned under the mouse.
- Move – moves the shape that is current positioned under the mouse.
- Resize – resizes the shape that is current positioned under the mouse.
- Undo – repetitively undo the last action.
- Redo – repetitively redo the last action.
- Save – saves the current template to the name and category identified on the right-side panel. The current template can be saved as an alternate name, which can then be edited.
- Delete – deletes the current template.
- Reset – resets the editor.
- Cancel – exits the editor.