| Applies to X9Vision? | Applies to X9Validator? | Applies to X9Assist? | | | | Applies to X9.37? | Applies to ACH? | Applies to CPA005? |
| Yes | Yes | Yes | | | | Yes | Yes | Yes |
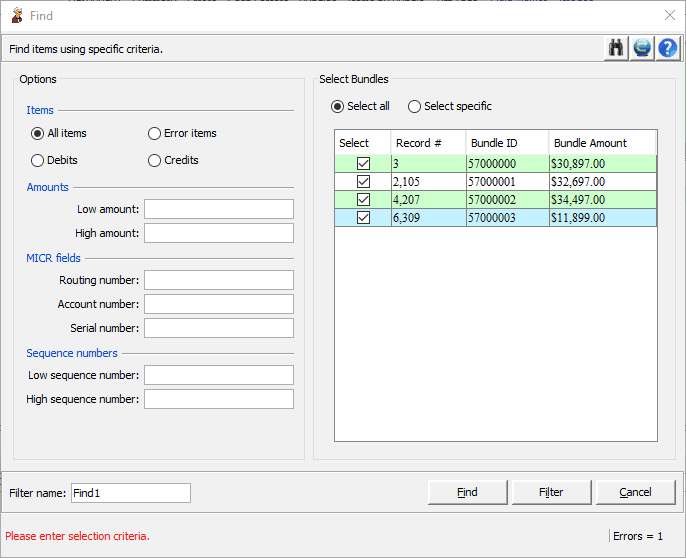
Find allows you to easily locate items (debits or credits) based on your criteria. This can be done across the entire file, or can be limited to one or more selected bundles. Find is designed to locate items. If you want to look for data in specific record types that are not associated with checks (or in any other record types), then you should instead consider use of the Search tool.

Find will allow you to select items based on any combination of the following fields:
- Amount or amount range
- Routing, account number and/or check serial number
- Sequence number or sequence number range
The routing number should be entered on a full nine (9) character basis. This includes the check digit field and should also include any embedded dashes. The search will be done using the routing number exactly as provided.
The check serial number will be used to search both the OnUs and the AuxOnUs fields. Items will be considered a match when your provided check serial number is located in either of those fields.
In addition to these very specific criteria, you can also select items at a higher level. For example,
- Debits only
- Credits only
- Only those items which contain errors
Using Find
Find remembers the last selection criteria that you entered within the current session and will retain that for your next find. You can reset back to defaults using the “refresh” button on the tool bar.
By default, Find will search across all bundles within the currently loaded file. You can use the bundles panel to instead limit your search to one more more specific bundles. After entering your selection criteria, you must then press the “Find” button to initiate your search.
The file viewer will position you on the first check that meets your specified criteria. You can then use the Find Next button (from the tool bar) to easily advance through the additional items. Note that the Find Next button will always indicate your relative position within the selected records. You are always informed of your current position and the total number of records that meet your defined criteria.
Creating Filters
You can build a filtered view using the “Filter” button. Filter uses the selected items to build and add a separate tab to the DashBoard. You can manually set the name that is assigned to the new tab, or alternatively allow Find to automatically assign the next logical tab number.
Creating filters provides several advantages and useful functions. Filter allows you to position on several records at the same time so you can bounce back and forth. An example would be having the primary tab focused on a bundle record while having the filter tab positioned on a specific check. Or you can position on different items within the two windows, which is helpful when you are looking for differences or duplicated items.
There are other advantages to using filters. For example, filters can be used by reporting and as the basis to print or save a list of the selected items based on your criteria.