| Applies to X9Vision? | Applies to X9Validator? | Applies to X9Assist? | | | | Applies to X937? | Applies to ACH? | Applies to CPA005? |
| No | Yes | Yes | | | | Yes | Yes | Yes |
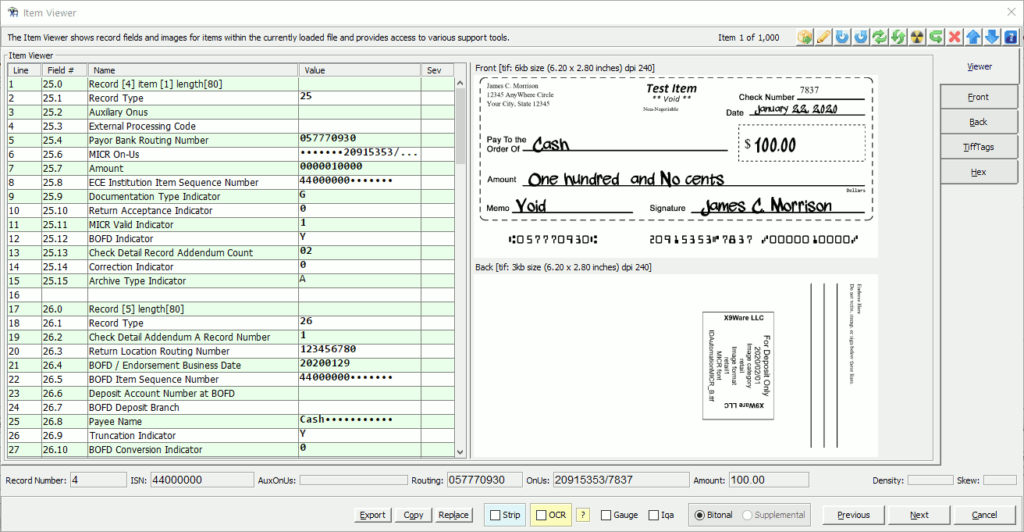
The Item Viewer is launched from the DashBoard using either the tool bar or by clicking one of the thumbnail images for the current item. For x9 files, the Item Viewer allows the data and image to be displayed for a given item within the same panel. It provides a larger scale image and hence image features that otherwise may not be readily visible from the smaller check images displayed within the DashBoard. It also implements alternative viewer modes which are implemented using tabs located on the right.
The Item Viewer also has enhanced functionality which is made available through action buttons located at the bottom of the panel.
- Viewer: Shows the fields for the current item on the left and the front/back images on the right.
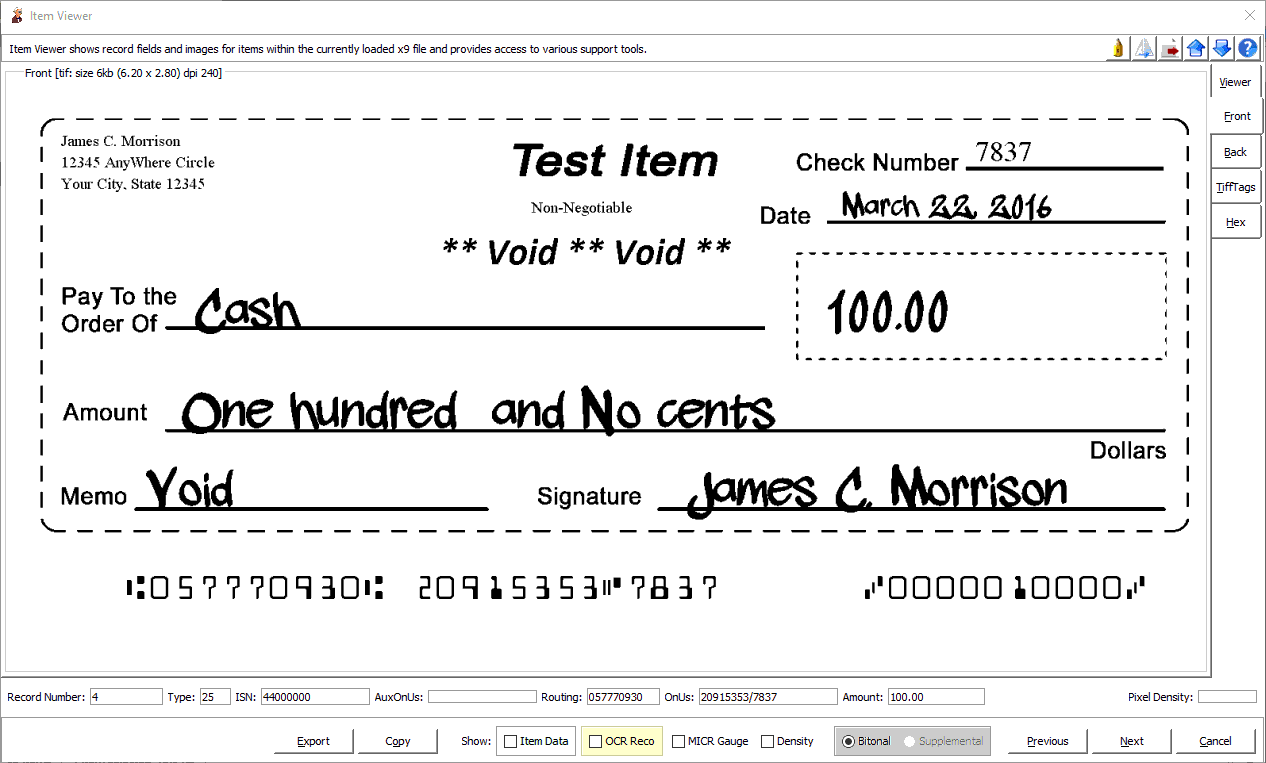
- Front: Displays a zoomed front image for the current item.
- Back: Displays a zoomed back image for the current item.
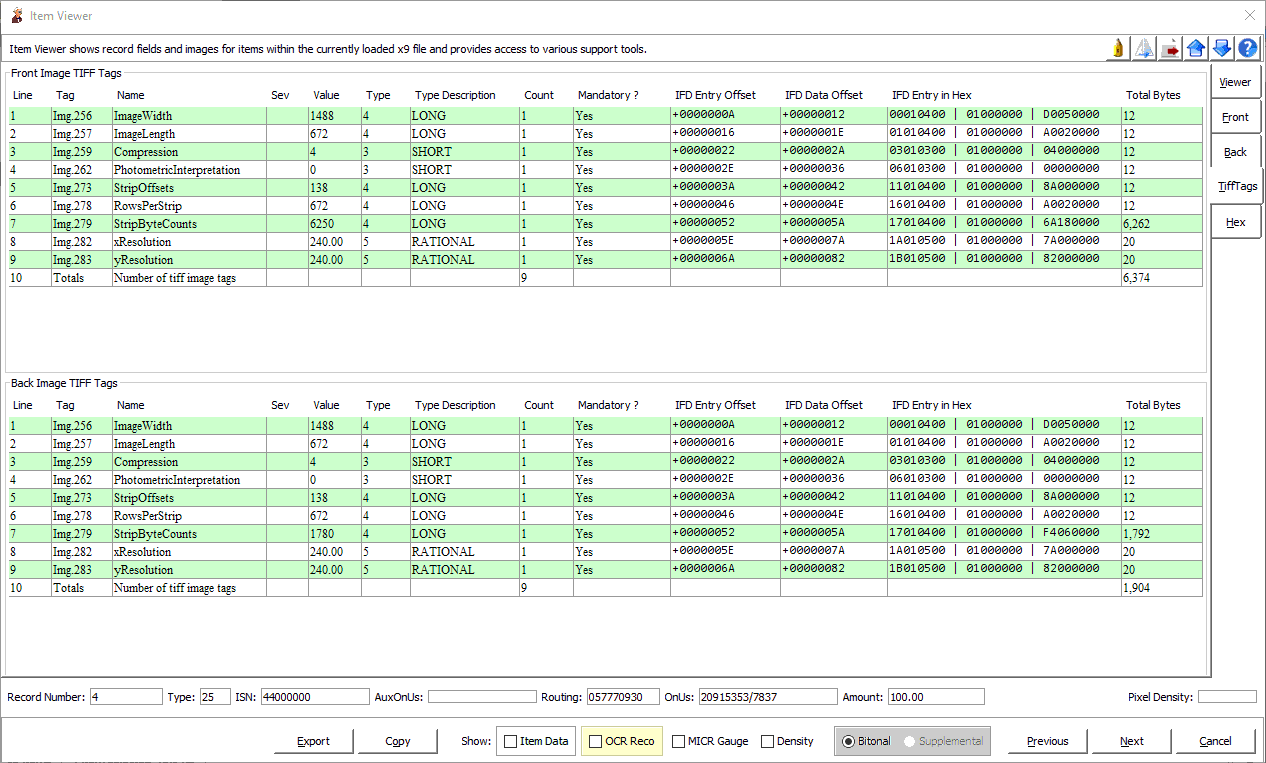
- TiffTags: Displays the tiff tags that are associated with the front and back images that are associated with the current item.
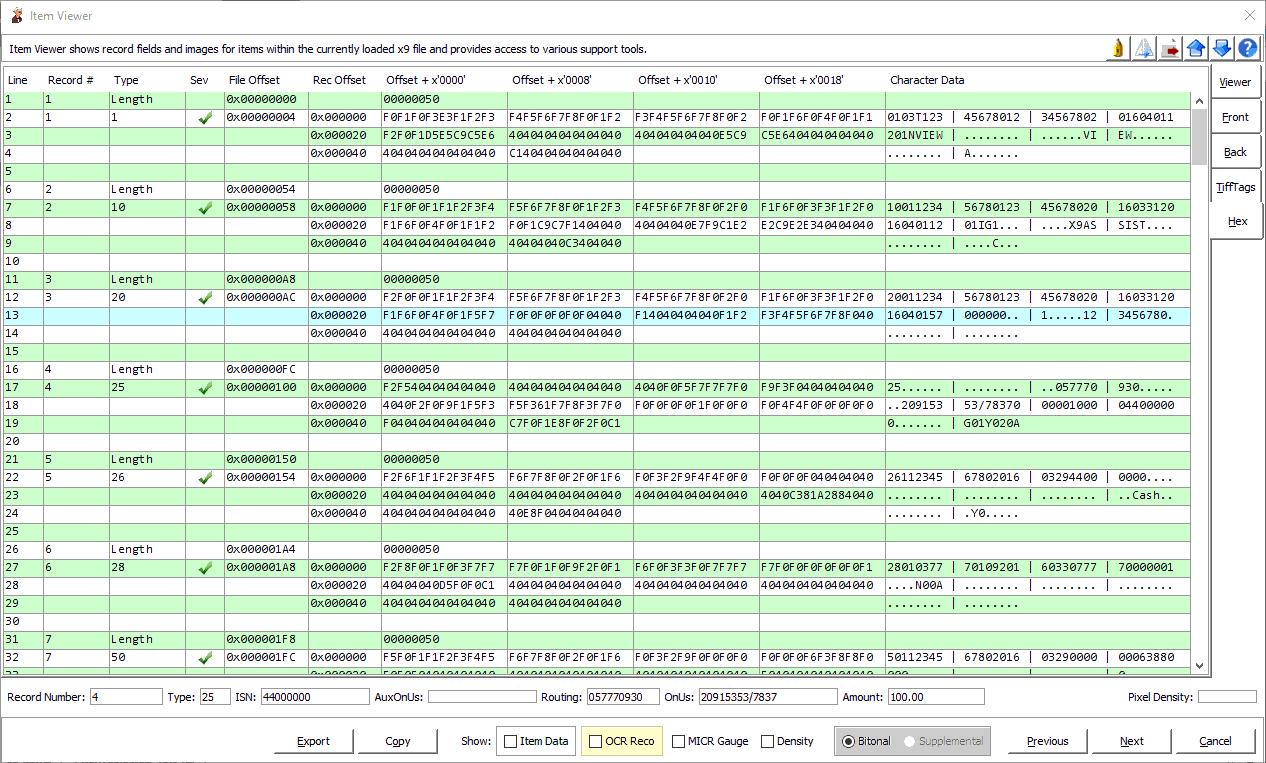
- Hex: Displays the current record group in hexadecimal format.

Browsing Functions
The Item Viewer includes previous and next functions which allow you to walk through the images that are located within a given batch. This is convenient and allows you to examine images within the currently loaded file while remaining within the viewer itself. When paging forward or backward, the viewer will continue to show items until the very last item within the file is displayed. This browsing process may automatically move forward to the next bundle or cash letter based on the current file structure. The Item Viewer returns to the DashBoard when there are no more items to be displayed.
Modifying Images
When users are licensed for modify, the Item Viewer has tools which allow the front and/or back images for the current item to be modified. This is accomplished using various icon-based tools that are available on the toolbar, followed by a replace function. Our UI has implemented image modification here, since this allows you to actually see the image as changes are made. For example, possible steps to modify an image might be:
- Sharpen the image.
- Deskew the image for better horizontal alignment.
- Repair the image to rescale (if needed) and recreate tiff tags.
- Replace the image, which attaches the modified image to the current item.
- Closely review results.
- Save the modified file to an alternate file name.
- Use X9Assist-Compare to compare the original file to the modified file.
Once the replace function is used to attach a modified image to the current item, it can be subsequently reverted from the modification log.
Item Viewer Tools
The following x9.37 tools are available within the Item Viewer:
| X9.37 Tool | Description |
| Export | For x9 files, individual images can be exported to externally stored image files. These images can be written in TIFF format, but can also be written in other standard industry image formats such as PNG, JPG, GIF, etc. When images are exported in TIFF format, the exported TIFF file will contain the exact TIFF image data that exists on the x9 file (the same segments, TIFF tags, etc). |
| Copy | For x9 files, individual images can be copied to the clipboard. This is a very convenient way to move images from X9Assist to other desktop applications. |
| Strip | For x9 files, appends a MICR strip using the actual item data from the current item record. The data will be extracted from the current item record which may for example be a 25, 31, 61, or 62. This function is very useful when you want to visually compare the image against the data that exists within the file itself. |
| OCR | For x9 files, appends a MICR strip using data from an OCR Read, which is based on the X9Ware E13B-OCR product. The MICR data is extracted from the actual front side TIFF image. This function is very useful when you want to visually compare the image against our OCR reat results. The ? Button can subsequently be used to gain more insight into our E13B recognition process. |
| MICR Gauge | For x9 files, displays a MICR gauge as an overlay against front side images. This tool allows you to easily confirm that a MICR line has been properly positioned within the clear band area (the bottom 5/8 inches of the image). |
| Density | For x9 files, displays the pixel density for the current image, which is either the “top” image (when both images are being displayed) or the current when in zoom ode. This tool can be used even when IQA is not enabled and provides insight into the too light or too dark attributes for any given image within an x9 file. |
| Sharpen | For x9 files, applies our sharpening tool to the current image and thus attempt to remove background noise. Depending on the condition of the image, the sharpened image may improve your image visibility and otherwise bring data into focus which is otherwise not readily viewable. |
| Blur | For x9 files, applies our standard blurring tool to the current image to simulate scanner issues. If our standard blur does not meet your needs, we have included steps (documented below) to export an image so you can apply blurring using an external image tool such as GIMP. |
| Deskew Left | Slightly rotates the image left to attempt to remove possible capture skew. The undo button can be used if the results are not acceptable. |
| Deskew Right | Slightly rotates the image right to attempt to remove possible capture skew. The undo button can be used if the results are not acceptable. |
| Flip | Changes the image orientation by 180% (horizontal flip). |
| Exchange | Exchanges the front and back images for this item. |
| Repair | Attempts to repair the image using our TIFF repair capabilities. |
| Undo | Undo recent changes that have been done within this item viewer. Undo cannot reverse changes after a replace has been done; that can only be done through the modification log. |
| Next | The next item will be displayed within the current file. |
| Previous | The previous item will be displayed within the current file. |
X9 Image Replacement
Image changes are logged in the same manner as field level modifications. Image changes can similarly be viewed using the modification log and can be reverted in the same manner.
Images can be replaced using one of the following standard facilities:
- Current viewer image: the current viewer image will be used to construct the replacement image. This image may have been modified using one or more tools such as sharpen, deskew, or repair.
- Load external image: a replacement image is loaded from an external image file. If the replacement image is in TIFF format, then the byte array for that image will be inserted into the type 52 record exactly as it appears in the external image file; no image manipulations will be performed. If the image is in another supported format (PNG, JPG, GIF, or BMP) then it will be converted to a standard TIFF image that is compliant with the x9.100-181 exchange standard. This includes conversion to black/white as needed. You retain the most control over your replacement image when it is provided in TIFF format, hence it is our recommendation to do that whenever possible.
- Missing: the standard missing image document will be used to replace the current image (which might be either a front side image or a back side image). The missing image document is a standard document that can be customized to contain specific data per your site requirements. There are separate missing-front and missing-back images that can be defined as needed.
- Both as missing: the standard missing image documents will be used to replace bot the front side and back side images for the current item. This is typically done when the wrong item image is associated with the current x9 item.
- Zero length image: field 52.18 will be set to zero which implies that no image is present within the type 52 record. However, the type 52 record is retained within the item group.
Blurring an Image
It is occasional desirable to blur an existing image, as a negative use case for image processing. Creating blurred images is a complex process for several reasons:
- The image manipulations needed to blur an image are in themselves complicated.
- There are various blurring techniques that can be applied which will result in different results. These various tools need to be tried through a trial-and-error process, to achieve the best output subject to your requirements.
- Various parts of an image can be blurred. You may want to blur parts of the MICR line, the CAR/LAR fields, other image fields, or the entire image to emulate a bad camera.
The toolbar includes our standard blur which can be applied to an image. However, if our standard blur does not meet your needs, you can use this alternative sequence of tasks to utilize an external tool (like GIMP) to manipulate the image. GIMP not only has various blurring tools, but also allows the blurring to be applied selectively to the image, with do-undo support as you work on the image. You do not need to use GIMP, you can use another tool of your choice. The sequence of steps to accomplish image blurring (or other image manipulations) is as follows:
- Go to the item that you would like to manipulate.
- Double click the front thumbnail image, which will put you into the item viewer.
- Using the buttons at the bottom, you can export this one image out to a file name of your choice.
- Now use another image tool to blur this image. My tool of choice would be GIMP. Once you’ve finished, export this image as a PNG.
- Go back to X9Assist, open up the file, and go back to this item.
- Turn on modify using the upper right hand corner check box that’s on the dashboard.
- Now modify the type 52 front image record.
- Inside the modify record panel, you will see field 52.19 at the bottom. Click modify to modify this image.
- Use the button options to indicate you would like to replace the image from an external image.
- Go into the file system, and select the image that you have blurred and saved.
- The selected image will now replace the original image, and you will see it in the item viewer.
- Finally, you can say this X9.37 file and you will have the image exactly as it has been modified and within this file.
Now that you have the modified file that contains a blurred image, you can either send it for image processing, to a downstream application, or print if that would be preferred.

Zoom (Front-Back) Mode
Zoom mode uses all available display size to show the current front or back item images. You can simply click within the image to return to the standard item viewer.
Note that the image heading includes the image size (in bytes), image dimensions (in inches), and the DPI that was used to encode the image pixels.

TiffTags Mode
TiffTags mode shows the TIFF tags that are associated with the front-back image pair that is associated with the current item. This tool provides immediate feedback on the TIFF tags which are present and eliminates the need to export the image for this analysis. The “sev” column contains an icon which indicates the severity of any errors which were identified during validation.
The IFD (Image File Directory) from the image is displayed in hex format on the right, providing access to very detailed information regarding the associated TIFF tags.

Hex Mode
Hex mode shows the data records within the current item group in hexadecimal format. There is no attempt to reformat this data in any way. This data comes directly from the file and will be shown in the character set (EBCDIC or ASCII) as used within that file. Images are included in the formatted data when present.
The hex display includes the file offset for each data record that is shown. This offset allows you to open the x9 file in another file viewer (eg, HxD) and use the record offset to further analyze the record level content.